XenServer is primarily being used as a hypervisor platform for XenDesktop VDIs. Although the installation of XenServer 7 is not really difficult it would be nice when installing multiple XenServer hosts that you can automate the installation part. In this article I will describe the possibilities of creating an (almost) unattended installation of XenServer 7.x I will both touch XenServer 7.0 (which we made of a customer. Long story about certification processes of software being used) and the latest version 7.2 (which also applies to 7.1).
PXE versus ISO
The first decision that need to be made how the installation process will be started. There are two options available; PXE boot (which is more challenging from an infrastructure point of view) or booting from the XenServer ISO (which is easier to make, but required some more manual actions during the installation). As you can see both methodologies have some advantages and downsides. In many organization using PXE can be challenging, which also was the case at my customer. Luckily on the Internet several articles are available (for XenServer 6.5, but this has not changed for XenServer 7) so if you want to use PXE google for articles about XenServer 6.5 and PXE and you are good to go. In this article I will use the ISO methodology.
Storing the files
The first step is to find a spot to store the required files for the unattended installation. There are several methodologies to store and use the files. Personally I find using a HTTP server one of the most easy methods. For this article I’m using IIS of Microsoft to store the files. You can easily use an existing IIS server for this. Just created a new directory to store the files. I named the directory XenServer7, but it can be any name.
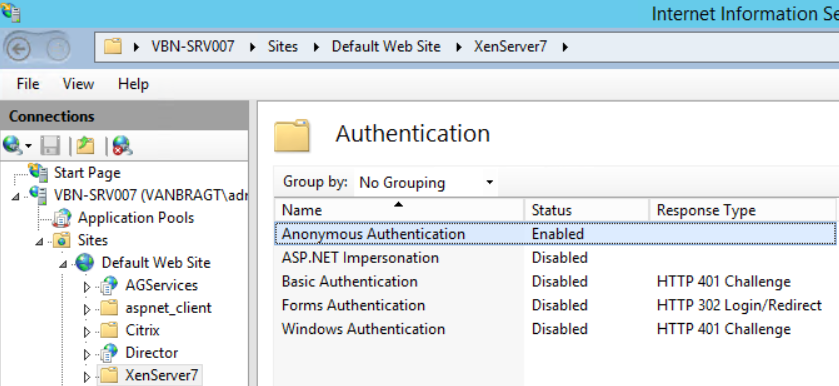
Within IIS you need to check if anonymous connections are configured (see below figure)
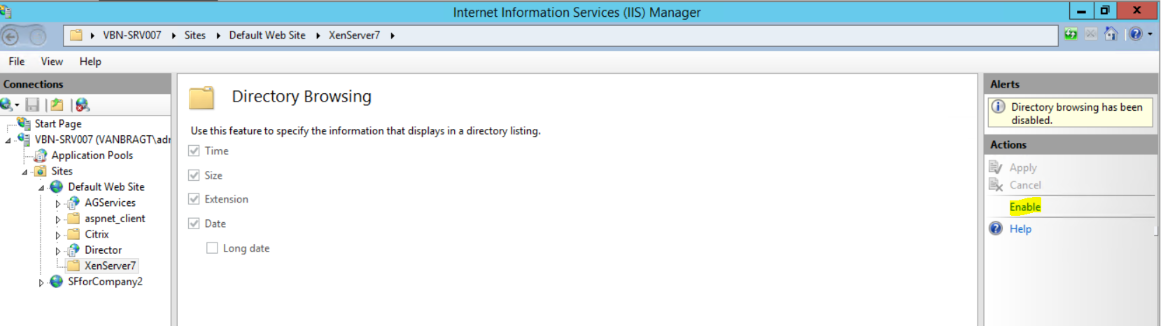
Secondly it’s required to enable directory browsing which is disabled by default.
If the directory ready we can start storing the files. The first step is to extract all files of the XenServer 7 ISO and place them in a directory. I’m using the Source directory for this.
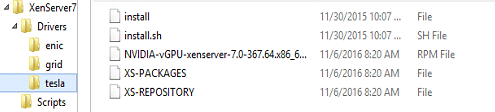
Secondly you need to determine if additional drives are required for your XenServer infrastructure. The NVIDIA driver for vGPU and the Cisco Enic Driver are some examples. For drivers there are several methods available, I’m using the easiest methodology which also kicks in at the earliest phase by adding the driver in the answerfile (I will come to that topic pretty soon). To use this methodology you need to have the ISO file of the driver (also known as supplemental pack) and extract the files of that ISO into a separate directory for each driver.
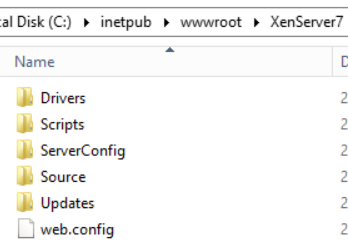
We will also create a directory for storing the Updates/Hotfixes (Updates in this article), the Scripts (Scripts in this article) and the answerfiles (ServerConfig in this article). We will fill those later in this article. As those directories are used later on this article a quick summary of the directories created in the below shown image.
Answerfile
For the unattended we need to have an answerfile for specifying the specific settings for each XenServer host. I have set-up a template answerfile with all settings already configured except the hostname and IP address of the host. This makes it easy to create an answerfile for ach machine, by just copy the template file for a host and enter the hostname and IP address.
In the answer file you need to define at least the following settings:
- Installation mode
- Primary disk
- Hostname
- Source
- IP settings
- DNS Settings
- NTP Settings
Optional you can specify required drivers. Those we already have unpacked in the directory. For each driver you require you need to add a line <driver-source type=”url>[DirectoryDriver]</driver source>. The [DirectoryDriver] is the path of the directory where you extracted the files of the ISO file into.
Together this comes to the following template answer file.
|
<?xml version="1.0"?> <installation mode="fresh" srtype="lvm"> <primary-disk gueststorage="yes">sda</primary-disk> <keymap>us</keymap> <hostname>[SERVERNAME]</hostname> <root-password>DefaultPassword01</root-password> <source type="url">http://VBN-SRV007.vanbragt.local/XenServer7/Source/</source> <driver-source type="url">http://VBN-SRV007.vanbragt.local/XenServer7/Drivers/enic/</driver-source> <script stage="filesystem-populated" type="url">http://VBN-SRV007.vanbragt.local/XenServer7/Scripts/post-script.sh</script> <admin-interface name="eth0" proto="static"> <ip>192.168.21.[IP-SERVER]</ip> <subnet-mask>255.255.255.0</subnet-mask> <gateway>192.168.21.21</gateway> </admin-interface> <name-server>192.168.21.1/name-server> <name-server>192.168.21.2</name-server> <timezone>Europe/Amsterdam</timezone> <time-config-method>ntp</time-config-method> <ntp-server>192.168.21.1</ntp-server> <ntp-server>192.168.21.2</ntp-server> <ntp-server>2.de.pool.ntp.org</ntp-server> </installation> |
When enrolling a new server I copy this file, give the file the name of the server and fill in the IP address and hostname.
If you have looked into the answerfile you will see line with where a script is called (post-script.sh). The answerfile offers the possibility to run some command in different phases of the unattended. With this line we start a small script that copies another script to the XenServer an creates a service which will run once after the initial installation and reboot of the XenServer. This makes it possible to do additional installations and/or configuration after the initial unattended installation. The script post-script.sh I used is full copy from Citrix knowledgebase article CTX217700. I got issues when I copied the text in Notepad++ in a Windows machine, the script did not do anything. At the end we created the script on a XenServer via VI and after that we copied the script (via WinSCP for example) to the IIS server.
|
#!/bin/sh # Script used from CTX217700 by Wilco van Bragt touch $1/root/post-executed wget http://146.106.11.200/XenServer7/Scripts/first-boot-script.sh -O $1/root/first-boot-script.sh chmod 777 $1/root/first-boot-script.sh touch $1/etc/systemd/system/postinstall.service chmod 777 $1/etc/systemd/system/postinstall.service cat > $1/etc/systemd/system/postinstall.service <<EOF [Unit] After=xapi.service [Service] ExecStart=/root/first-boot-script.sh TimeoutStartSec=infinity [Install] WantedBy=multi-user.target EOF ln -s /etc/systemd/system/postinstall.service $1/etc/systemd/system/multi-user.target.wants/postinstall.service |
As stated the script copies another script in which the actual actions are executed. You can add several commands to it. Some actions that could be added are installing additional software (RPM files), installing XenServer updates/hotfixes and adding a license to the server.
I used the script mostly for applying hotfixes/updates to the environment. There were several scripts available, but I found most pretty complicate on either getting the updates on the XenServer, determine which updates needs to be installed or the actual installation steps. I used some info from several scripts and adjusted most of those line to match the principle to keep it as simple as possible.
The update component exists of three steps. First step is to download the available updates from a directory on the IIS server to the XenServer. Secondly the script creates a list of updates available on the Xenserver, followed by last step; the commands to actual install the updates.
The update mechanism is different between XenServer 7.0 and XenServer 7. 1 and higher. In XenServer 7.0 .updates files are being used, while the later versions are using .ISO files. Also the CLI parameters are a bit different. Nevertheless the same concept can be used for both ways. I have enclosed both scripts below. The script also includes an example for licensing the XenServer via this script as well. For the updates a reboot is required, so the script logically ends with a reboot of the host. Again the same applies as for the post-script.sh we needed to edit the files on XenServer as within Notepad++ the code gets corrupt (thanks goes to Daniel Buonocore for helping me out on this part).
So what you need to do is to fill the directory with the updates you want to have installed on the host. Be sure that the .update or .iso files are place into that directory as the downloading code only download those files (so you need to extract the update out of the ZIP file, when downloaded from the Citrix website).
|
#!/bin/sh #Unattended XenServer 7.0 Script #Created by: Wilco van Bragt/Daniel Buonocore #Version: 1.0 #Creation date: 13-09-2017 #Installing XenServer 7 Updates mkdir /tmp/updates HOSTLABEL=`hostname` sleep 10 wget -nd -r --no-parent -A.xsupdate -P /tmp/updates http://vbn-srv007.vanbragt.local/XenServer7/Updates for updatefile in `ls /tmp/updates/`; do sleep 60 echo "Uploading Update $updatefile ..." >> /var/log/messages HOSTUUID=$(xe host-list name-label=`hostname` --minimal) echo $HOSTLABEL echo $HOSTUUID PATCHUUID=$(xe patch-upload file-name=/tmp/updates/$updatefile) sleep 10 echo "Installing Update $updatefile ...">> /var/log/messages xe patch-apply uuid=$PATCHUUID host-uuid=$HOSTUUID rm -f /tmp/updates/$updatefile xe patch-clean uuid=$PATCHUUID done #License XenServer 7 xe host-apply-edition edition=xendesktop host-uuid=$HOSTUUID license-server-adress=lic.vanbragt.local license-server-port=27000 #Reboot XenServer (Finalizing Installation) echo "Removing Service">> /var/log/messages rm -f /etc/systemd/system/multi-user.target.wants/postinstall.service sleep 40 echo "Reboot XenServer. After reboot unattended installation is finished">> /var/log/messages reboot |
|
#!/bin/sh #Unattended XenServer 7.2 Script #Created by: Wilco van Bragt/Daniel Buonocore #Version: 1.0 #Creation date: 25-09-2017 #Installing XenServer 7 Updates mkdir /tmp/updates HOSTLABEL=`hostname` sleep 10 wget -nd -r --no-parent -A.iso -P /tmp/updates http://vbn-srv007.vanbragt.local/XenServer72/Updates for updatefile in `ls /tmp/updates/`; do sleep 60 echo "Uploading Update $updatefile ..." >> /var/log/messages HOSTUUID=$(xe host-list name-label=`hostname` --minimal) echo $HOSTLABEL echo $HOSTUUID IPADDRESS=$(hostname -I) echo "IP Adress is $IPADDRESS" PATCHUUID=$(xe -s $IPADDRESS -u root -pw Welkom01 update-upload file-name=/tmp/updates/$updatefile) sleep 10 echo "PatchUUID = $PATCHUUID" echo "Installing Update $updatefile ..." xe patch-apply uuid=$PATCHUUID hostuuid=$HOSTUUID rm -f /tmp/updates/$updatefile xe patch-clean uuid=$PATCHUUID done #Reboot XenServer (Finalizing Installation) echo "Removing Service">> /var/log/messages rm -f /etc/systemd/system/multi-user.target.wants/postinstall.service sleep 40 echo "Reboot XenServer. After reboot unattended installation is finished">> /var/log/messages reboot |
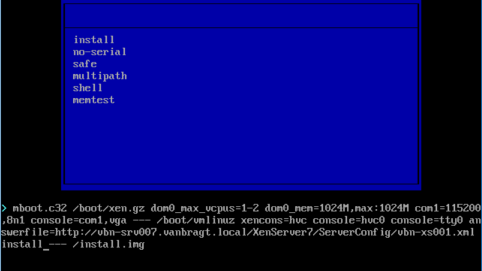
Now all preparations are ready we can start deploying XenServer hosts. Therefore we boot from the XenServer 7 ISO. At the first screen of the installation wizard we type menu.c32.
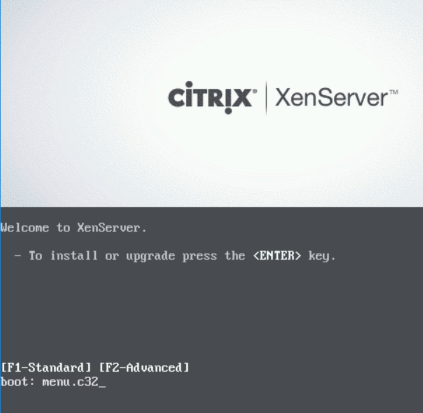
Next we need to press tab within 5 seconds. The command line parameters are shown. To this commands we need to add the answerfile. In my example we need to add answerfile=http://vbn-srv007.vanbragt.local/XenServer7/ServerConfig/vbn-xs001.xml install. This parameters need to be set before --- /image
If everything is set-up correctly the installation will automatically install and configure XenServer 7.x and installing the updates.
Conclusion
In this article I described the steps to create an unattended installation for XenServer and shares the scripts I have set-up to install the XenServer updates on those machines.