In March 2012 Citrix released XenDesktop 5.6. In this XenDesktop release the RingCube acquisition was integrated into the product as a feature called Personal vDisk. One of my customers was interested in this XenDesktop 5.6 with the Personal vDisk as an alternative for those who could not fit in the XenApp environment. I build a Proof of Concept with XenDesktop 5.6 combined with Citrix Provisioning Services 6.1. In this article I will describe the installation steps, the configuration and my real life experiences with the products and the setup.
Installation
The installation process can be divided into four components; the XenDesktop back-end component, the Citrix Provisioning Services back-end, the VDA (Virtual Desktop Agent) into the master vDisk and the so called Citrix Provisioning Services Target Device.
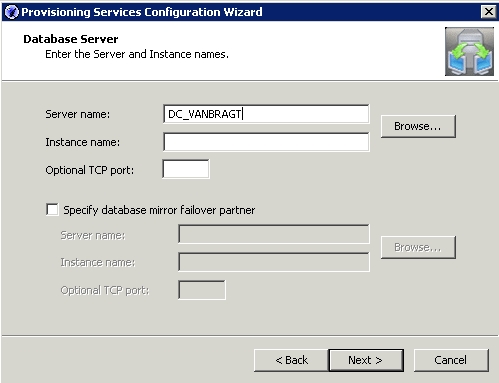
I started with the installation of the Citrix Provisioning Services (CPS). If you installed the product earlier the installation steps are pretty familiar, nothing much changed in comparison with previous versions. The real installation is pretty straightforward with the normal question like the installation path and accepting the license agreement. There are some requirements like SQL Native Client and some snap-ins, but they are installed by default within the (manual) installation steps. Right after the installation you can start the Provisioning Services Configuration Wizard. With this wizard you configure the whole CPS environment; this wizard can be stared for reconfiguration any time you want. With the first server you are creating a so called farm, the other servers you are adding afterwards (for fault tolerancy/load balancing) will join this farm. Citrix Provisioning Services need a SQL database which logically needs to be specified. You also can configure to which SQL server Provisioning Server should be failover (automatically), think that’s a real good option available.
During the initial wizard when creating a farm besides the farm you also need to specify the first site, the first collection and (the first) store (where the vDisk will be stored).

During the wizard you also need to specify the license server, if you would like to use the automatic computer account password updates, which NICs should be used for streaming, the communication ports and choosing which services you would like to enable/where to use. For the services you are asked what type of account you will be used. Remember that when you using windows based shares you need to use an active directory account for these services. When using the Windows Firewall you need to open the configured ports manually, CPS detect if the Windows firewall is active and warns you to open the ports. Last but not least the CPS console is a separate install. This can be installed on any machine. The installation is really straight forwarded, the only thing you should keep in mind that besides the console you can install also the Boot Device Manager, which is needed when you don’t have a PXE server and/or DHCP server available. Because in the PoC we both don’t had them I installed this option to create the boot device. I will describe this later.
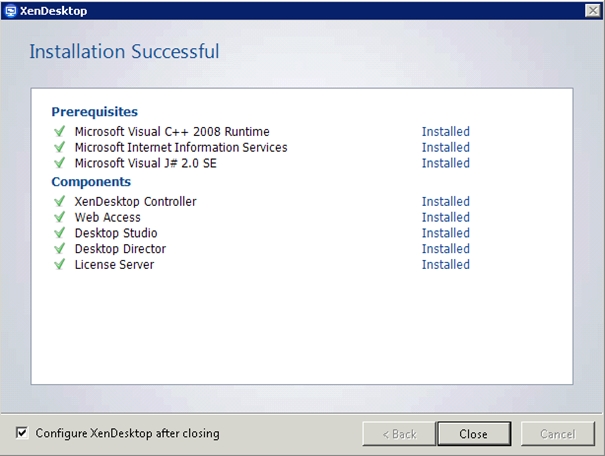
Next is XenDesktop installation. Just like the other Citrix products the installation is simplified a lot, because the configuration part is a separate part. During the installation you need to accept the license agreement, to specify which components you would like to install: XenDesktop Controller (creates and manages virtual desktop, so actually the real product), Web Access (a Citrix Web Interface, especially configured for using XenDesktop), XenDesktop Studio (the management and configuration console), Desktop Directory (Daily Operations and Helpdesk website) and the Citrix License Server (manages the licenses for all Citrix product, so can be used by other Citrix products as well or you could use your existing license server). XenDesktop also requires a SQL database, if you don’t have a SQL server available you could use SQL Express (only use this for PoC of real small environments). XenDesktop opens Windows Firewall ports automatically or provides a message that you need to do this on a third party product. XenDesktop has some additional required components, but those are installed automatically within the installation process.
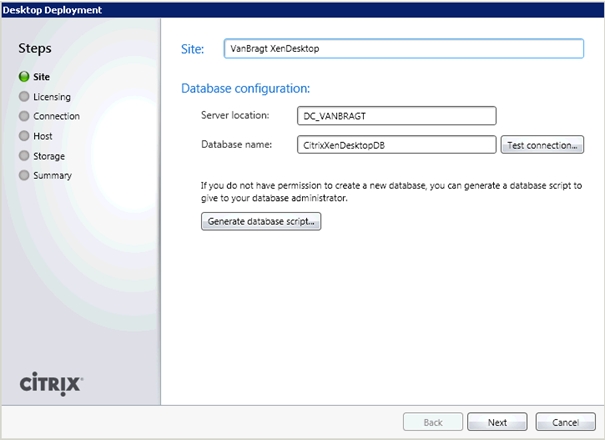
After the installation part, you can directory start the configuration part. This is done via the XenDesktop Studio Management component. When you did not install SQL Express (just the way I did) then the Quick Deploy option is greyed out and you should use the Desktop Deployment option. The second and following servers should use the Join existing deployment option. Be aware that the XenDesktop has special requirements according to the database Collation. Therefore probably you need to create the database in advance and use the database script provided during the wizard to set-up (or with a second server to join the infrastructure). I used SQL 2005 while officially SQL 2008 is supported, but it works. I advise you to use the manual (eDocs) for this part, because if you don’t follow the exact procedure it will not work. It cost me lots of time trying it without those steps.
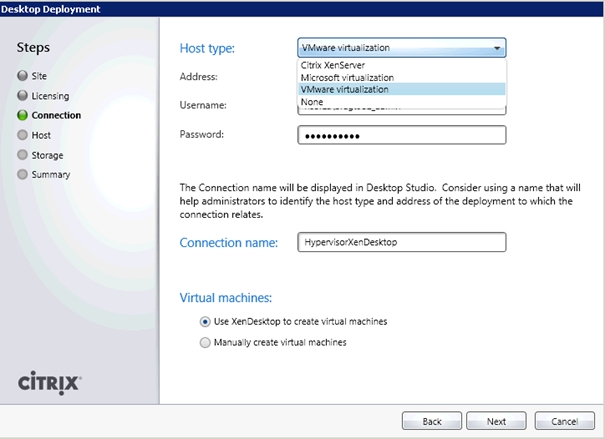
After the database configuration you need to specify the license, followed by providing access to the hypervisor layer. The product supports the big three, logically XenServer, VMware vSphere and Microsoft Hyper-V. I used vSphere, so you need to specify the vCenter server with credentials to connect to that environment. Don’t forget to choose Use XenDesktop to create virtual machines. This is requirement in a later phase even if you are using PVS as I’m doing in this Proof of Concept.
The last step is to select storage where the VMs and the personal vDisk will be stored.
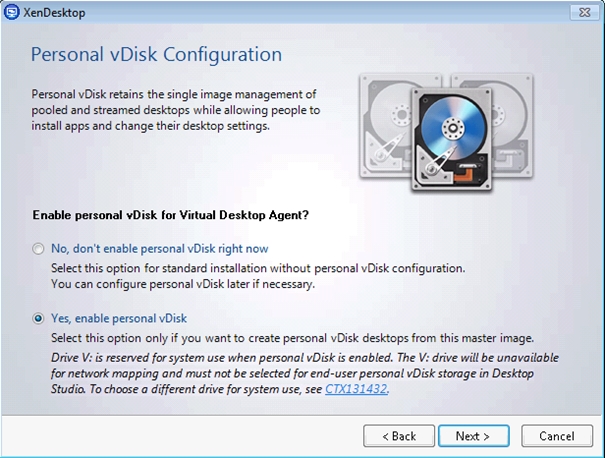
Now the back-end components are in place we are ready to build the machine, which will be used to build the master image. Building such a machine is pretty easy, just create a regular virtual machine with a hard disk and install the required operating system. In this case I used Windows 7 just booting from a mounted ISO file. On this machine you install everything what you would like to have in the base image like Applications, supporting components and so on. Also into this base image the XenDesktop Virtual Desktop Agent (VDA) and the Citrix Provisioning Services Target Device should be installed. Citrix describes several scenarios about the order of installing these two agents when using Personal vDisk (PVD) as described here. I installed the VDA first. When installing you have first to choose which VDA you would like the user, the normal one of the one specific for HDX 3DPRO. You can also specify if you would like to install the Citrix Receiver together with the VDA. You also need to specify if you would like to use the PVD option, it’s installed by default, but with this part you are actually enabling it.
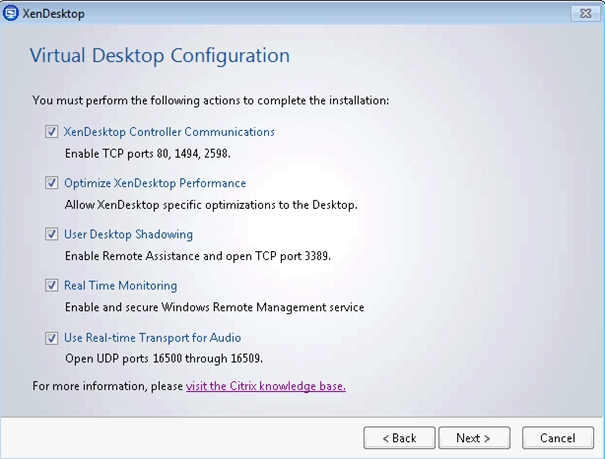
Next you to specify the controller location or tell the installation you will do these later using policies and let the VDA open ports on the Windows Firewall. Personally I think this last screen is a bit unclear. It says you need to perform the following actions, but actually if you check them the installation part takes cares of this part. A bit confusing I read it first I need to do that manually, but in that way the checkboxes raised a question mark.
After the installation I choose to shut-down the machine, so the PVD Inventory could run.

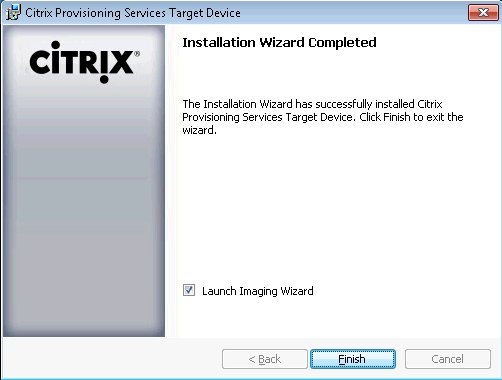
After that I installed the Citrix Provisioning Services Target Device software. This installation is really straight forwarded. You only need to specify the destination location of the software. At the end of the installation you start directly the Image Wizard to create the vDisk. With that wizard I will start the second part of this article, which will be posted soon.
Conclusion
In this first part of the Real Life Experiences article about XenDesktop, Provisioning Services and Personal vDisk I showed and described the installation steps of the products and agents. Summarized its key is that you should use the manual for the XenDesktop Desktop Broker installation according to set-up and connect to the database. It did cost me some time, before I got this running. Personally I think some options that you check or uncheck should be described a bit more logical, a good example are again the Use XenDesktop to create the virtual machines and the Firewall ports screen during the VDA agent installation. In part two I will continue with the Image Wizard to create the vDisk that will be the master vDisk for the XenDesktop machine.