Unattended installation of Front-End products like Citrix XenApp 6.5 or Windows 7 is really commodity nowadays. Unattended installations of back-end components are done less, which is actually logically. Such components are not installed in large amounts and are only executed once (per version). However more and more back-end components can be installed silently, mainly for the large enterprises. For such environments where the amounts of servers are higher, the efforts to set-up an unattended installation are worth doing those actions in comparison with manually install those servers. Citrix Provisioning Services (PVS) offers unattended installation and configuration and at one of my project we needed to install more than 10 Provisioning Services servers. This is definitely a use case to use the unattended possibilities of Citrix Provisioning Services. In this article I will explain how you can install Citrix Provisioning Services unattended including my experiences with it so far.
Citrix Provisioning Services (PVS) installation process can be divided into two parts, the actual installation of the software and the initial configuration wizard, which will set-up the Farm (with the first server) or join a farm (the second and following servers). Just like Citrix XenApp 6.x this is divided in two different phases by Citrix. I personally really like that concept, it is more flexible and you can call scripts for different set-ups. First I will start with the first phase, which is (by separating installation and configuration), the same for all Citrix Provisioning Services. After that I will focus on automating the configuration phase.
Unattended Installation
Before we can install PVS we need to ensure that the prerequisites are already installed on the server. As PVS 6.1 is supported on Windows 2008R2 or lower, by default .Net Framework is not installed, while this is required for PVS. This can be easily automated using servermanagercmd.exe (although officially depreciated it still works like a charm) or using PowerShell. The command for both is not that difficult, if are already familiar with PowerShell I would recommend to use that command.
|
ServerManagerCmd.exe -install NET-Framework-Core or Import-Module Server Manager Add-WindowsFeature Net-FRAMEWORK-Core |
When you have downloaded the PVS 6.1 software you will find separate executable for several components and platforms (64bit and 32bit). In this article I will use a separate SQL server (so no SQL express and a license server is already in place, so the focus is the installation and configuration of Provisioning Services. First we need to install the PVS software which can be found in the folder Server (within the downloaded ISO). Do not forget to copy also the folder ISSetupPrerequisites within the Server folders as that one holds installation components of prerequisites that are automatically installed by the PVS installation process. Depending of the platform you will install the PVS software you need PVS_Server_x64.exe (64bit) or PVS_Server.exe (32bit). As this is only the installation there are not much parameters needed. Optional you can specify a logfile location, so you can use your ESD or your own scripts to check if the installation actually succeeded. I will the 64 bit version as an example, as I’m using Windows 2008R2 as the OS for this article.
|
PVS_Server_x64.exe /s /v"/qn /l c:\log\pvsserver.log |
Secondly you can install the Provisioning Services Console. This is another executable that can be found in the folder console. Again there are two executables available, one for 32bit platforms ( PVS_Console.exe) and one for the 64bit platforms (PVS_Console_x64.exe). The unattended parameters are exactly the same as the PVS software. Again optional /l can be used to specify a logfile location, so you can check the installation process. You can also use Again I will use the 64bit version for showing the example in figure 3.
|
PVS_Console_x64.exe /s /v"/qn /l c:\log\pvsconsole.log |
Not exactly meant for the PVS back-end component, but I just want to mention that also the Target Device software can be installed silently when you are automating the creation of your golden image (and you should do that actually). The parameters are exactly the same, so pick the correct device software (according you platform) and add /s /v” /qn /l c:\log\pvsdevice.log.
Now we have installed the software components it is time to start looking at the initial configuration options.
Unattended Initial Configuration
In manual installations the Provisioning Services Configuration Wizard will be started to create or join a farm. When you read the Citrix documentation (eDocs) it looks like the option to run the initial configuration wizard silently is only available for joining a farm. However this is possible although there is not much information to be found. Some people are mentioning that you should create the database and tables in advance, which are possible using an executable delivered within the provisioning services called dbscript.exe (can be found in C:\Program Files\Citrix\Provisioning Services by default). With dbscript.exe you can create a .sql file which can be run to create a SQL database manually.
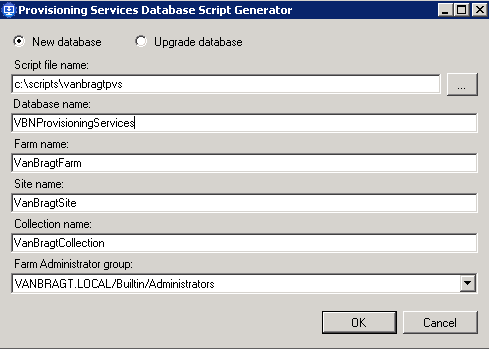
As you can see in above shown screenshot you can specify some settings required and the database script file will be saved. This file can be scripted again with OSQL (depreciated for a long time, but still available in SQL 2012) or SQLCMD. However this is not required as some people are thinking. You can also let the database be created with the initial configuration file. Personally I think you would use the SQL script in organizations where it is not possible/allowed to create database out of application installation/configurations, but this task is executed by the DBA. With the script the DBA can set-up the database as required by PVS.
When this is the case you should know that this is actually the creation of the farm and you don’t need to run a server to create the farm anymore. In other words all servers should join the farm, so you only need the follow the instructions for the second and following servers in this article series.
The file needed to run the configuration wizard unattended is by default not available. You can create it by running the configwizard.exe (available at C:\Program Files\Citrix\Provisioning Services by default) with the /c. The configwizard.exe /c will create a file called ConfigWizard.out. This ConfigWizard.Out include all possible parameters that can be used by the running the ConfigWizard silently. You need to determine which settings are required and which are optional and which you need for your environment. The ConfigWizard.Out file is created at C:\ProgramData\Citrix\ProvisioningServices for Windows 2008 and Windows 2008R2. I did not test on 2003, but there are mentions to the C:\Program Files\Citrix\Provisioning Services or the C:\Document and Settings\All Users\Application Data\Citrix\Provisioning Services.
In the next part I will describe the most important options in the ConfigWizard.out so we can create the answerfile for the unattended process. For the second and next servers you can also create the answerfile using the ConfigWizard.exe with the parameter /s on an already configured server. This will show the configuration wizard with the manual steps. You follow the wizard where by default the values are already filled in (by you previous manual configuration). It’s important that you need to select the option Join existing Farm. When you select Finish the wizard will create a ConfigWizard.ans (at the same location as the ConfigWizard.Out) that is completely predefined for your PVS infrastructure. As stated you already need to have a configured server for this, so this cannot be used for the first server (it’s technical possible, but your actually configuring the server manually including creating an answer file for a first server (which is already build). This file still needs some small editing, but this will become clear later in this article series.
Summary
In this first part I described the options to install the PVS software unattended, followed by the preparations and explanation to set-up an answerfile for the unattended configuration wizard. In part two I will continue describing to set-up the answerfile for both the first as the second and following servers.