Citrix released the Linux VDA back together with the XenDesktop 7.6. At the moment of writing the article Citrix released version 1.4 of the Linux VDA. For previous version Citrix released a PDF with the installation and configuration steps, for 1.4 this is currently only available in the edocs. Unfortunate both available options are not fully complete, are missing some steps (for some environments) and/or are using not the best commands or steps. Luckily I was at a customer with lots of Linux knowledge and we got is sorted pretty quickly. In this article I will write down the steps we configured the Linux VDA.
As I’m a Linux noob I add as much as possible information, with Linux knowledge you probably can skip several steps. I’m also using the default Linux Red Hat installation for this article, but I noticed that especially Linux techies use different install basis. I will use RedHat 7, there are (big) differences between RedHat 6 and RedHat 7.
Preparation
Actually the installation is mostly about configuring Linux configuration correctly and setting-up the Active Directory connection for Linux. Let’s start with those steps.
Before we can start we need to ensure that YUM is preconfigured as this part is used a lot during the manuals. For YUM to function it needs to be registered to a repository. Most companies will probably have their own library, but you can use the Red Hat repository as well. You need to register to the repository by using the command subscription-manager register, followed by subscription-manager attach.
The first step is configure the hostname correctly. The hostname can be found in the file /etc/hostname in RedHat 7. If it’s OK you will only find the name of the machine in the file. There are several ways to see the content of the file, for example you can use VI, some graphical text editor on the Linux machine or remotely via WinSCP. I will use the last option for this article. You can verify the hostname by typing the command hostname. According to most manuals the hostname should NOT be the FQDN, so only the name.
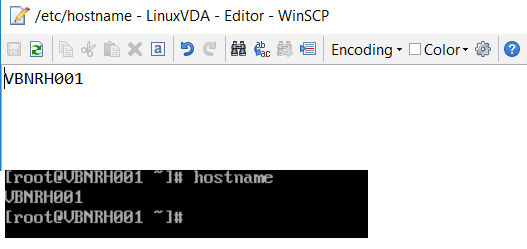
Second step is to assign a loopback address to the hostname file on the Linux machine. This is done by editing the etc/hosts file. At the 127.0.0.1 you need to add both the FQDN as the machine name at the start of the line. You can check if everything is correct by typing hostname –f in the CLI.

Logically you need to have the possibility to communicate with the Active Directory server(s) and the Citrix Delivery Controller server(s). Linux has (logical) similar commands for that, but they are not installed in the default installation. Even if you are nog familiar with Linux this process is pretty easy. You can ask yum which package is required by the command yum whatprovides <<program>>, for example yum whatprovides nslookup. Yum will show the packages in this bind-utils. Next you can install them via yum install bind-utils. After that you can use command like ping and nslookup to check if the Linux machine can communicate with the other components. Ping by default in Linux pings to the end, you can stop with <CTRL>+C.
Next in the guide is checking the NTP settings and if needed adjust those. Logically the clock should be in sync with the other servers in the infrastructure. The configuration is pretty different between RHEL 6.x and RHEL 7.x. Check the manual of Citrix for the exact steps, again it can be the case of the software is not installed yet (never forget yum whatprovides).
The next step is the Citrix manual is called Install OpenJDK, however actually the command does only check if java is actually installed. If you do they update command you can get the message that there is nothing to update as Java is not installed. If this is the case install java first. You can use yum whatprovides, but you the package information is also shown in the command Citrix is using in their manual yum info java-1.8.0-openjdk.
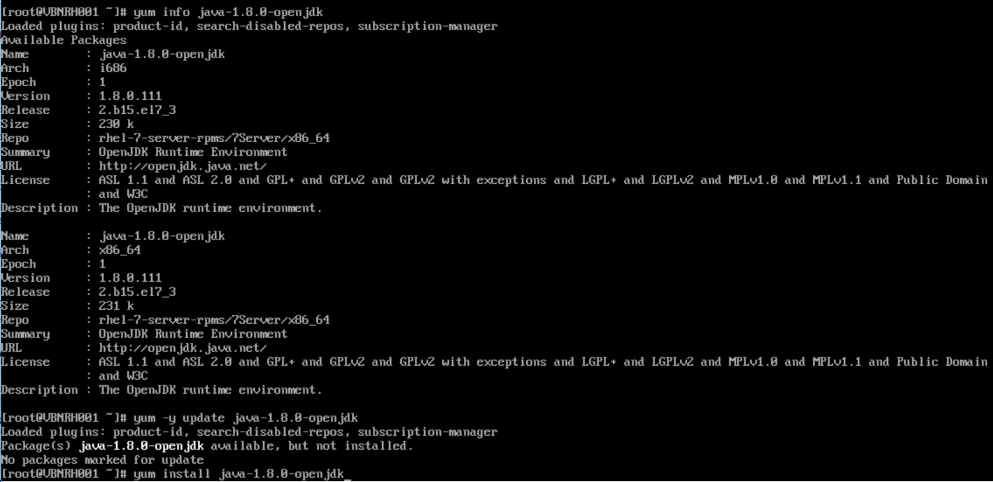
If Java was already installed you can run the update the package using the command yum –y update java-1.8.0-openjdk. If you just installed Java it is logically already up to date. Last you need to add a line to a file in the user profile. Via the article of Carl Webster I found an easy command to add by typing echo “export JAVA_HOME=/usr/lib/jvm/java” >>~/.bashrc
Next step is to install and set-up PostgreSQL. With yum all prerequisites are automatically installed. This installation part can take so time. First you need to execute the command yum install postgresql-server and if that part is finished yum install postgresql-jdbc. After the installation we need to initialize the database and ensure the service starts on boot. The command will create database files. The command is postgresql-setup initdb.
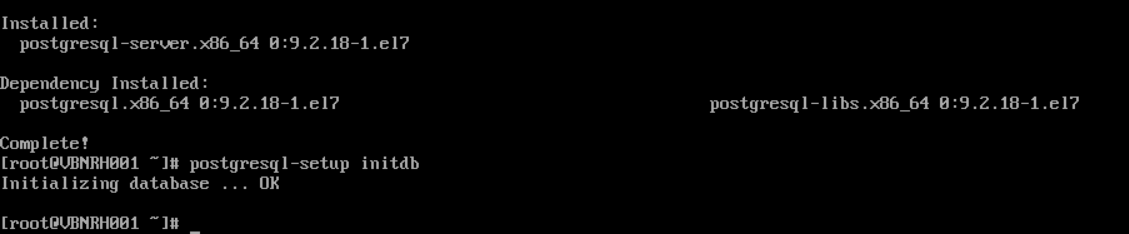
After the initialization we can start PostgreSQL via the commands systemctl start postgresql and systemctl enable postgresql. Via the commands psql –version and sudo –u postgres psql –c ‘show data_directory’ you can verify if PostgreSQL is functioning correctly.
For each hypervisor Citrix has written down to configure time synchronization correctly. As this differs for each hypervisor and Citrix wrote down the steps correctly please refer to the Citrix edocs <<LINK>> for these steps.
Now we are ready to set-up the Active Directory connection. Citrix support several methods available within Linux, but there are even more available. This can be an issue as each infrastructure has a specific method and this one need to be supported to work with the back-end. The most difficult part in this is the user authentication to back-end components within the Linux VDA. For this part discuss the connection with the responsible teams within the organization in advance. For this article I will use winbind as an example. Check the Citrix edocs for the steps for each method.
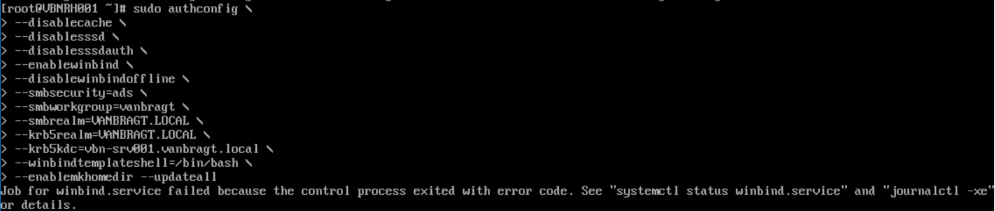
For winbind in the installation they are adding multiple package in one installation command, it seems. I don’t know if this is required/necessary, but I added the command as shown. Because it are multiple package/lines you can end the line with a \. This allows you to add the next line accordingly.

Next step is to start the winbind daemon via the command /sbin/chkconfig winbind on, followed by the command to configure the winbind authentication. The command is a pretty large string, which is shown in low below figure. You need to add your NetBIOS domainname in lower case at –smbworkgroup. The FQDN of the domain in uppercase at –smbrealm and –krb5realm and at a last one or more domain controllers of the domain at –krb5kdc. You will receive an error about the start of the winbind.service, this one can be ignored for now.
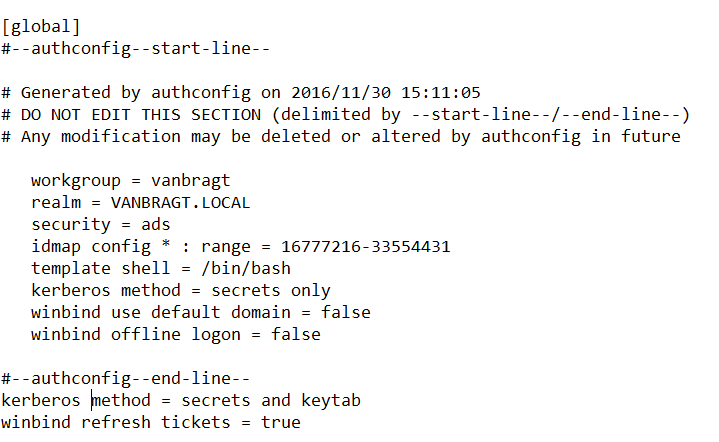
Open /etc/samba/smb.conf and add the lines to the file in thet [Global] section after the #--authconfig--end-line-- line.
kerberos method = secrets and keytab winbind refresh tickets = true
After editing the file we are ready to join the machine to the domain via het command net ads join <<FQDN DOMAIN NAME>> – u <<username AD>> where the username (logically) need to have at least permission to join a machine to the domain. I got erros about Kerbero, but the join was succesfull.

Next step is to open the file /etc/security/pam_winbind.conf and change the following lines under the [Global] section (also remove the ; at the front of the line) krb5_auth = yes krb5_ccache_type = FILE mkhomedir = yes
After these changes restart the winbind service via the command /sbin/service winbind restart
Again we need to alter a file. Open /etc/krb5.conf and change the content of the default_ccache_name line to default_ccache_name = FILE:/tmp/krb5cc_%{uid}
Next we can verify if the configuration is correct via a whole set of commands.
-
net ads testjoin à expected response: Join is OK
-
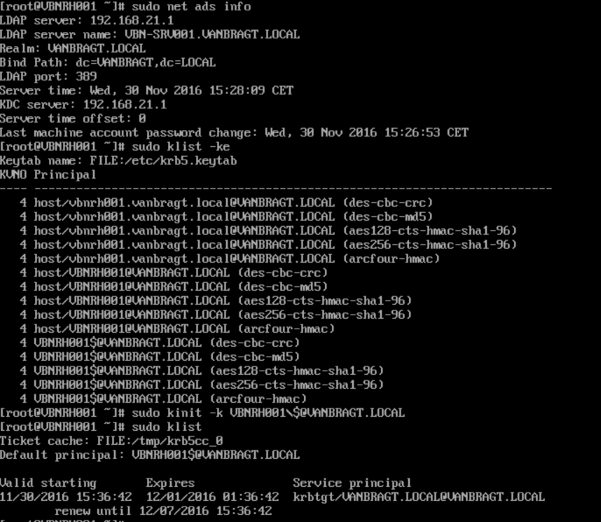
net ads info à shows information about AD and Domain Controller
-
klist –ke à shows the computerinformation (see below figure)
-
kinit –k <<MACHINENAME>>\$@<<;DOMAINNAME>> à shows nothing
-
klist à shows Kerberos ticket information
-
net ads status à show machine account details
We can also check if the user authentication is functioning by using the following commands
-
wbinfo –krb5auth=<<DOMAIN>>\\<<username>>%<<password>>
-
ssh localhost –l <<DOMAIN>>\\<<USERNAME>>

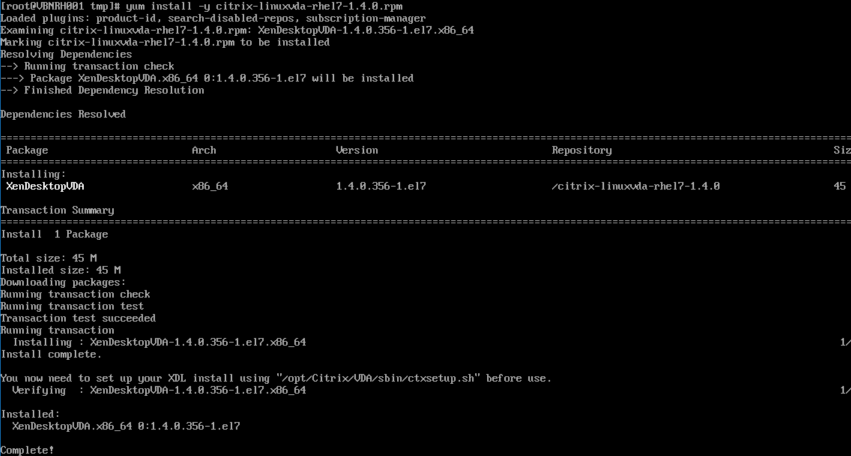
Now we are ready to start installing the Citrix Linux VDA. In earlier manuals Citrix was using rpm command, but according to the Linux guys around me that is not the way to go (when you are using yum for all other actions). The current installation steps for the 1.4 agent are using the yum command line. Big advantage is that all dependencies are automatically installed as well. The command line is yum install –y citrix-linuxvda-rhel7-1.4.0.rpm (from the directory where you uploaded the rpm file to your Linux machine).
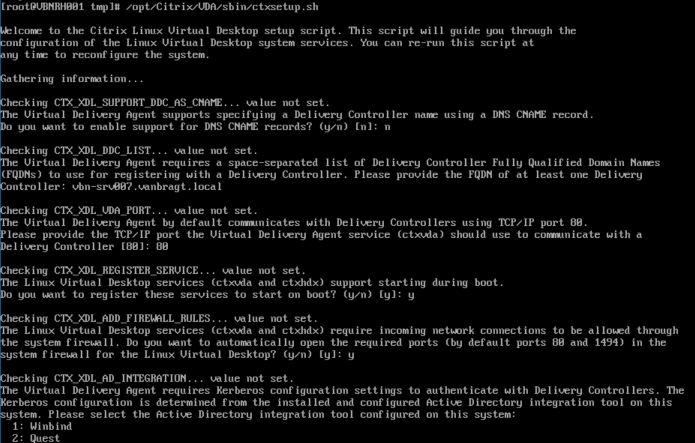
After the actual installation we need to configure the Linux VDA agent. This is done via ctxsetup.sh script, which is placed at /opt/Citrix/VDA/sbin/.
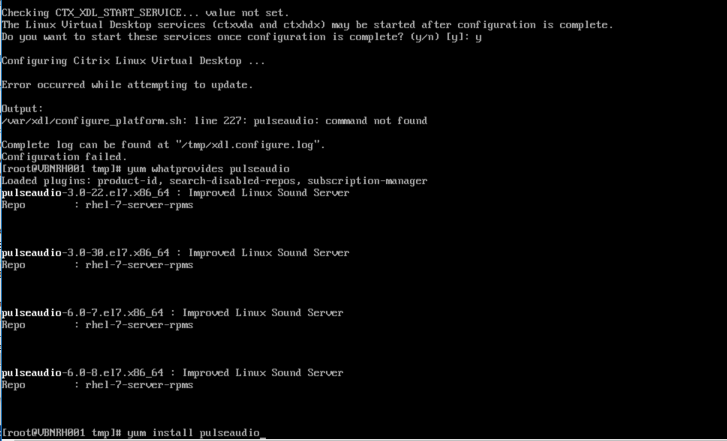
However at my environment (and also at the customer) I got an error about pulseaudio. We installed this component via Yum and run the script again.
You should also install the desktop, otherwise the user would only see a nice empty screen in the Citrix session. The easiest way is probably using yum groupinstall Desktop.
After this part we can add the Linux VDA to the Citrix XenDesktop infrastructure. The steps are pretty identical in comparison with adding Windows VDA. After setting-up the machine catalog and delivery group the user is able to start a Citrix session on the Linux VDA.
