Citrix Single Sign-On or Pass-through is already for a really long time. The configuration is not changed a lot in this years, however when I was configuring this at a customer it took me again some time before it was running. The configuration with the latest Receivers is changed a bit and there is not (I could not find it) total step by step guide for setting-up the Single Sign On (SSON). In this article I will write down the steps to set-up SSON including a granular way within an Enterprise organization using Citrix Receiver 4.x and XenApp/XenDesktop 7.x.
Step 1: Configuring the Delivery Controller
The first step is to configure a specific setting on the Delivery Controllers. Via a PowerShell command we need to enable request on the XML port. On each Delivery Controller in the XenDesktop/XenApp site the following command to be executed Set-BrokerSite -TrustRequestsSentToTheXMLServicePort $True. Logically to execute this command the Citrix modules need to be loaded before. This can be accomplished via Add-PSSnapin citrix.*. In the figure below the exact steps are shown.

If you forgot this step the single sign on will work, till the moment you actually click an application or desktop. You will got a message that the application/desktop cannot be started.
Step 2: Enabling Single Sign On with Citrix StoreFront
Secondly you need to enable Single Sign On within Citrix StoreFront. I will be using Citrix StoreFront 3.6 in this article. In earlier version locations of the settings are located on different locations within the console.
First you need to select the Store you would like to offer SSON functionality. From Action pane (on the right site) you select Manage Authentication Methods. Within this option you select the setting Domain pass-through. No further configuration is possible.
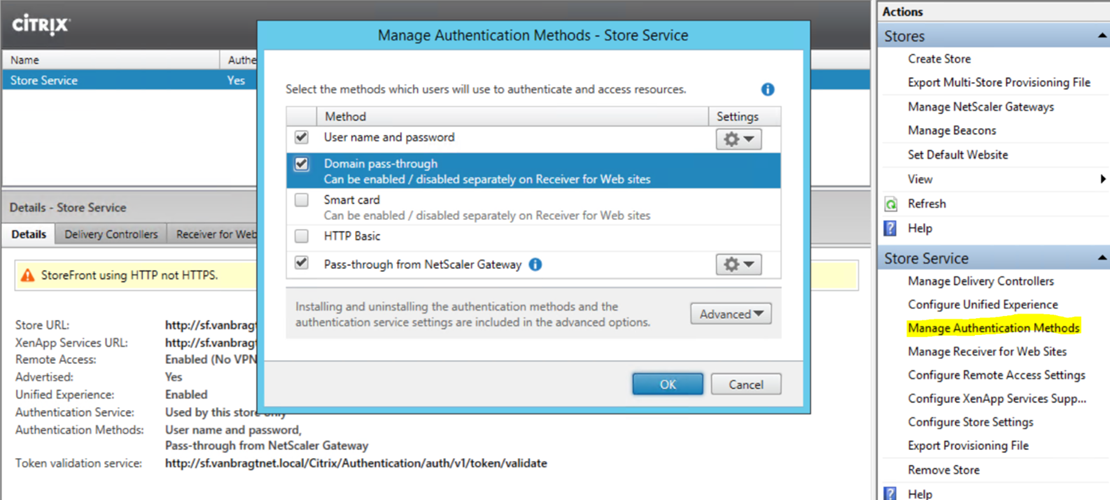
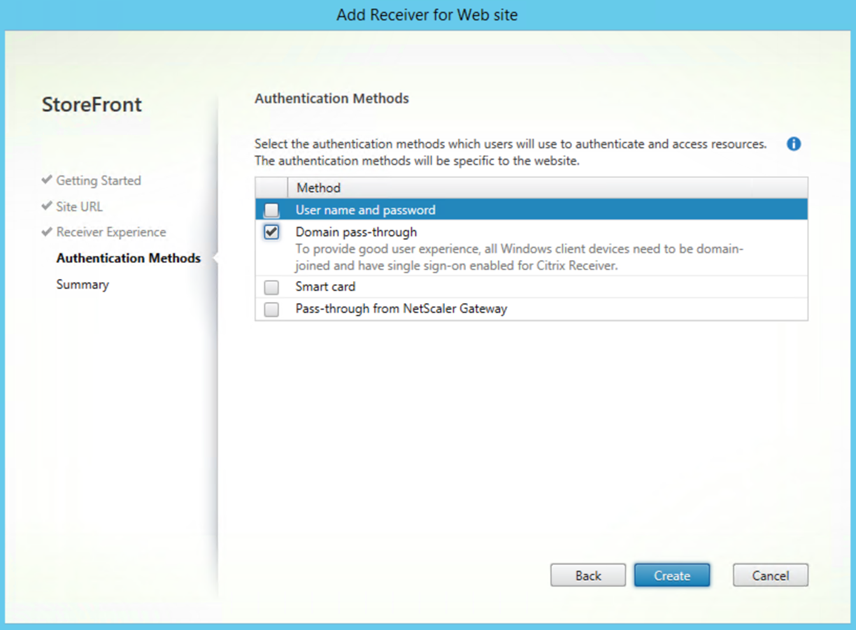
If you would like to offer SSON for the Citrix Receiver only, you are ready in StoreFront. If you would like to offer SSON within the Receiver for Web some additional settings are required. Just as for the Store you can combine several Authentication Methods for the Receiver for Web. However with the Receiver for Web it can be smart to create a separate Receiver for Web for pass-through. When you combine it with the method User name and Password, users need to push one button to see the applications. When we only have pass-through defined the user is presented directly without any interaction the application/desktop pane within StoreFront.
For SSON you are now ready at the StoreFront, however it could a good idea do some more configuration for branding and Receiver behavior (as you need the full Receiver client for SSON) for this site. Don’t forget to propagate changes to the servergroup if you are using more than one StoreFront server.
Step 3: Installing the Citrix Receiver
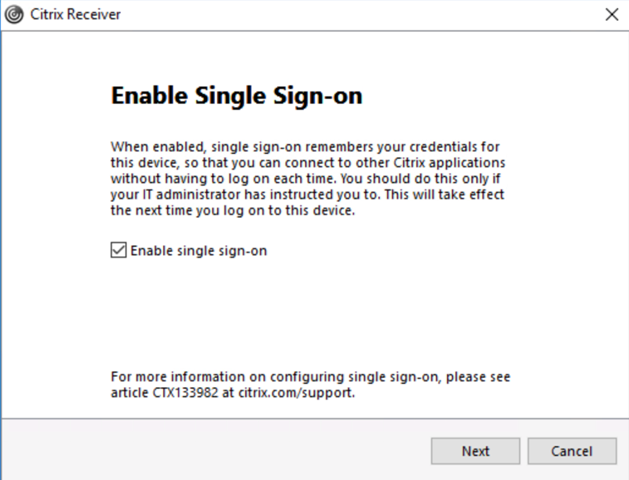
For Single Sign On you need to have a Windows domain joined machine (which sounds logical for SSON). Also when using HTTPS the certificated used on the StoreFront server should be trusted on the machine as well. Logically you need to have a Citrix Receiver as well. When you install the Citrix Receiver you need to enable the Single Sign On functionality. This is done by checking the box during the installation wizard (note: you won’t see this option as the machine is not domain joined) as shown in below figure.
When you have multiple machines you would offer Single Sign On you probably are using a software deployment system for distributing the Citrix Receiver. The command line parameters are pretty easy:
| CitrixReceiver.exe /silent /includeSSON ENABLE_SSON="Yes" |
When you would like to use the full Receiver you need to configure the URL of the site at some time. This can be done during the installation or later on via a GPO. I prefer using a GPO, but if you don’t have that option you can specify the store during the installation when using the command line. Replace the URL with the URL referring to your StoreFront URL including the correct Store name.
| CitrixReceiver.exe /silent /includeSSON ENABLE_SSON="Yes" STORE0="Store;https://sf.vanbragtnet.local/Citrix/Store/discovery;On;VanBragtNet Desktops and App" |
Although I don’t recommend it, you can use http for SSON (however username and password are passed over the network unencrypted). If you would like to use HTTP you need to add the parameter ALLOWADDSTORE=A and add an additional registry key to the machine. The registry key is shown below including a command line to add to the registry.
|
64bit Operating System reg add HKLM\SOFTWARE\Wow6432Node\Citrix\AuthManager /v ConnectionSecurityMode /t REG_SZ /d Any 32bit Operating System reg add HKLM\SOFTWARE\Citrix\AuthManager /v ConnectionSecurityMode /t REG_SZ /d Any |
Step 4a: Configuring the machine for SSON (manually)
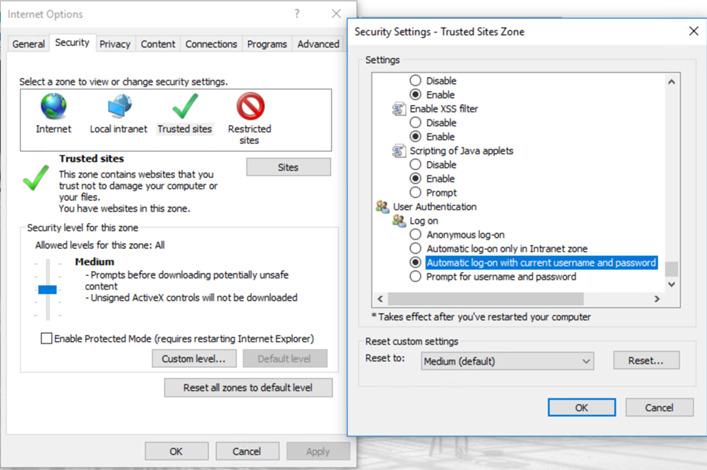
Unfortunate we are not there yet. We need to configure several settings to get the SSON up and running. We start with some configuration within Internet Explorer (this is also required when using the Citrix Receiver directly, so for both methods). First we need to the StoreFront URL to the Trusted Sites. This is done via the Internet Options, followed by the Security tab. Within the security tab you choose the Trusted Sites, followed by the Sites button. You need to add the URL you are going to use, so normally the HTTPS://<<URL>>, in case you want to use HTTP you need to the add the HTTP://<<URL>>.
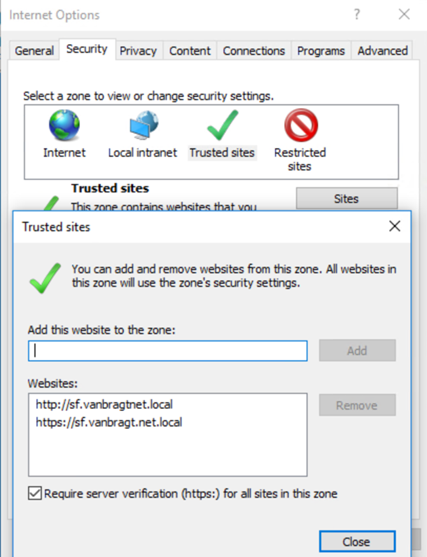
Secondly you need to change the settings of the Trusted Sites zone by using the Custom Level button on the Security Tab within Internet Options. Search for the option User Authentication – Logon (at the bottom) and change the setting to Automatic logon with current username and password.
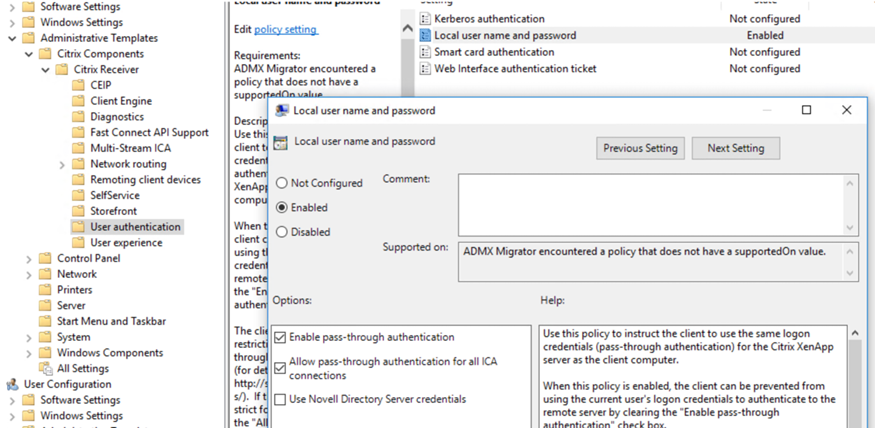
After Internet Explorer we need to configure some settings within the Local Policy. We need to copy the ADMX template into the PolicyDefinations directory. Copy Receiver.admx from %programfiles%\Cirix \ICA Client\Configuration (32bit) / %programfilesx86%\Cirix \ICA Client\Configuration to %windir%\PolicyDefinitions and Receiver.adml from the same location as Receiver.admx to %windir%\PolicyDefinitions\en-US.
Next you can start the Local Policy Editor (gpedit.msc) and go to Computer Configuration\Administrative Templates\Citrix Components\Citrix Receiver\User Authentication. Within User Authentication select Local Username and Password and select the options: Enable pass-through authentication and Allow pass-through authentication for all ICA connections.
Now we are done configuring SSON for Citrix Receiver (for Web). Now you should be able to configure the Citrix Receiver the store URL (if not done during the command line installation) or use the Citrix Receiver for Web.
Step 4b: Configuring the machine for SSON (automated)
Above steps are logically not the way to go if a larger amount of machines need to be configured using SSON. Luckily the settings can be configured using a GPO as well.
For that steps copy the admx and adml to your PolicyDefinitions folder. This can be locally on the machine where you set-up the GPO or a central PolicyDefinitions folder. You can check that by hovering over the Administrative Templates text within the Group Policy Management Editor.
When you have added the ADMX template you have the possibility to set the same settings as already described in step 4a: go to Computer Configuration\Administrative Templates\Citrix Components\Citrix Receiver\User Authentication. Within User Authentication select Local Username and Password and select the options: Enable pass-through authentication and Allow pass-through authentication for all ICA connections.
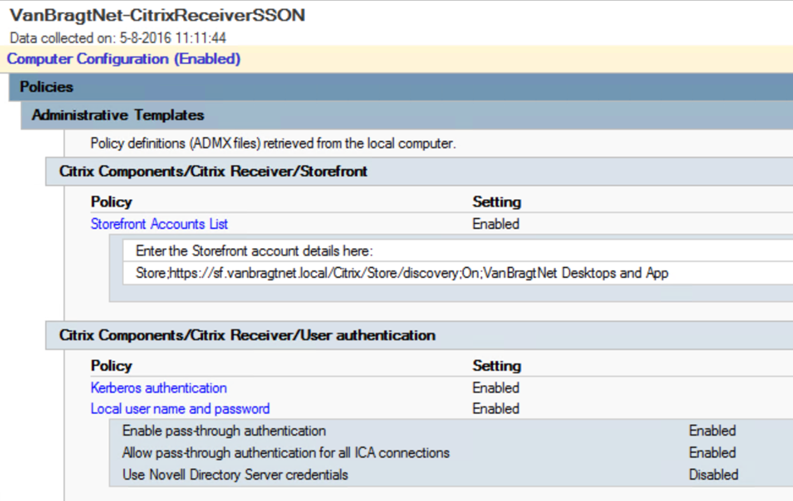
If you are using the Citrix Receiver directly you can also add the store via the GPO. The parameter is the same as specifying during the command line installation parameters, so Store; https://sf.vanbragtnet.local/Citrix/Store/discovery;On;VanBragtNet Desktops and App. You need to add this line within Computer Configuration\Citrix Components\Citrix Receiver\StoreFront on the setting StoreFront Accounts Lists (it looks like that with the policy a http address is not picked up by the client).
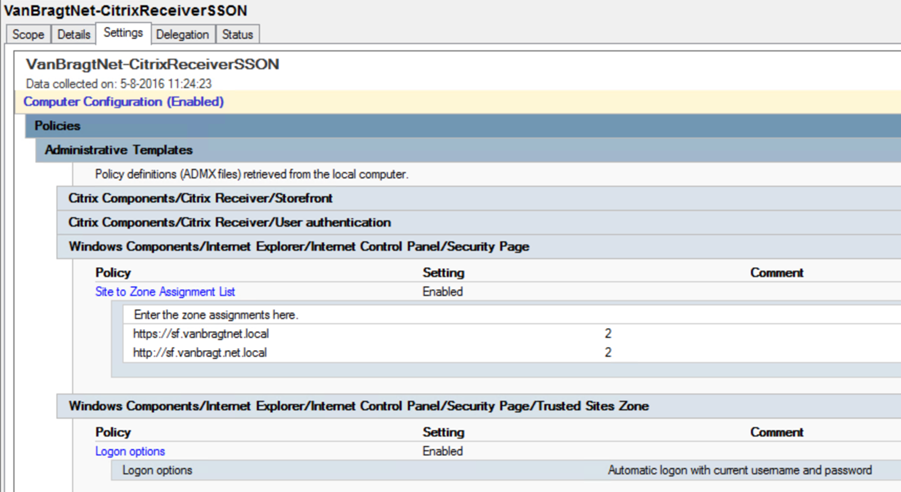
Secondly we need to define the Internet Explorer settings as well. Happily the settings are by default available within the GPO. The settings are both available on Computer Configuration and User Configuration. The first step is to go to Administrative Templates\Windows Components\Internet Explorer\Internet Control Panel\Security Page. Select the option Site to Zone assignment list and fill in the StoreFront URL with the number 2 (which represents Trusted Sites). Again you only need to add https, the http in the figure below is only a reference for those using http. Secondly we need to go to Administrative Templates\Windows Components\Internet Explorer\Internet Control Panel\Trusted Sites Zone and choose the setting Logon Options there and configure that one with Automatic logon with current username and password.
Step 5: (Optional) Starting the Citrix Receiver (for Web) automatically
After step 4 the environment is ready for being used with Single Sign On. To make the access for the users as easy as possible it can be useful to start the Citrix Receiver (for Web) directly when the user logs on. This is not difficult to accomplish.
For the Receiver for Web you just add a link in the Startup Folder to Internet Explorer with the parameter the Receiver for Web URL. For example: Internet Explorer.exe https://sf.vanbragtnet.local/Citrix/Passthrough.
When using the Citrix Receiver 4.2 or higher the possibility to create shortcuts automatically in the Start Menu of Desktop of the user is reintroduced. There are several ways to accomplish this behavior. The easiest way is to disable the User Subscription option with the Store Settings within StoreFront Console.
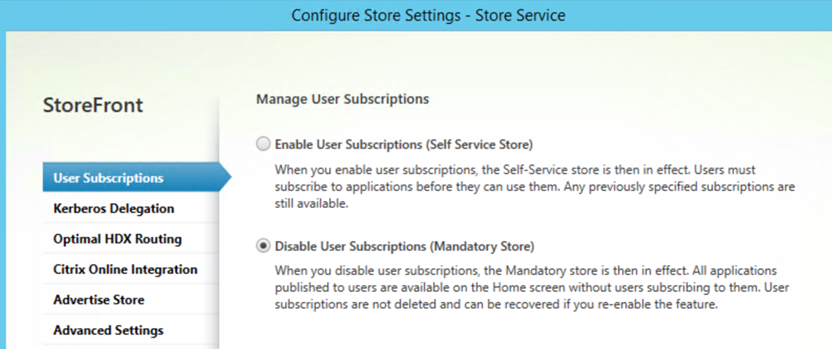
Via this option all shortcuts are shown in the users local Start Menu. Other options are described in CTX200924. For organizations using a User Envirionment Manager solution, can use the shortcut method as well. The shortcuts created can be added as application shortcut within the UEM product. Below is an example from my environment, which can be added to RES One Workspace or AppSense DesktopNow.
| "<<install-location>>\Citrix\ICA Client\SelfServicePlugin\SelfService.exe" -launch -reg Software\Microsoft\Windows\CurrentVersion\Uninstall\storeservi-ee876895@@VanBragtXD7.Notepad |
If you don’t want to use the local start menu option you can autostart the Receiver by starting the SelfService.exe without any parameters.
Summarization
In this article I showed the steps to set-up a Citrix Receiver (for Web) Single Sign On infrastructure including the settings on the Delivery Controller, Citrix StoreFront and the machine running the Citrix Receiver. As an extra is described the possibilities to auto start the Receiver (for Web) providing easy access to the end-users.