In the second part we discussed the steps under the hood for each MCS deployment type when creation the machine catalog, when VDAs are added and what happens when the user session is ended. In this part we will continue with the steps when updates are required on the base disk and more detailed information about the configuration settings during the Machine Catalog wizard.
Basedisk Update
Let’s start with the update procedure of the base disks. As already discussed there is a big difference between the methods where settings are retained and the methods where settings are discarded. For both the Fast Clone and Full Clone – Retain Settings the need for a new base disk is actually creating a new machine catalog besides the current catalog. Logically from a technical perspective the same steps are executed as described in Citrix Machine Creation Services Demystified Part II and also clear there is no possibility to actual update the master disk as those machines have changes saved in the difference disk. As described in Citrix Machine Creation Services Demystified Part I this is possible with the deprecated personal vDisk option and probably succeeded with a technique based on the Citrix App Layering technique (formerly known as Unidesk).
For the other methodologies the base disk can be “updated” as there are no settings retained within the difference disk. But before we start I would like to start with some XenServer CLI commands, which are useful to watch the process. Within XenServer (I guess also on other hypervisors) you can see the Fast Clone on a VDH level. First step is to determine the Storage Repository “name”, which can be done via pvscan command.
When you have the SR name you can use the vhd-util command to see which (VHD) disks are hosted on that specific Storage Repository. The full command name is vhd-util scan -f -m "VHD-*" -l "SRNAME" -p
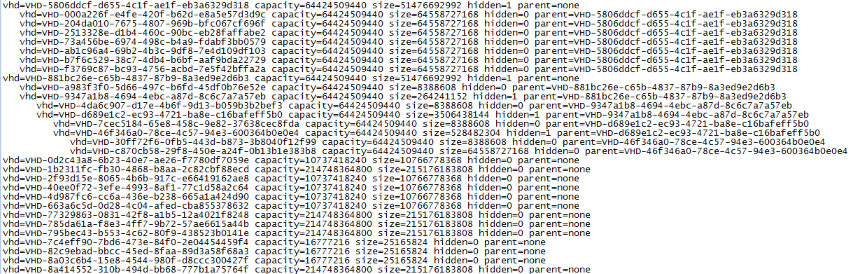
A similar output as above shown figure will be shown. If you only have one Machine Catalog it will be easy to see which are the MCS disks. To be sure or if you have you can use the command xe vdi-list uuid=<UUIDoutoflist> to find out exactly which one is the MCS chain you would like to follow. You will probably find a the highest called base copy, the second <NAME MC>-basedisk, followed by the actual machine names. In the figure below the chain starting with the disk VHD-5806ddcf-d655-4c1f-ae1f-eb3a6329d318 is our MCS Pooled Machine Catalog.
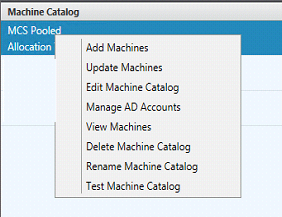
Now it’s time to start the update. On the machine catalog we select the Update machines options, which will logically lead to a wizard with the required steps.
Within the wizard you need to select the master VM (and optionally the corresponding snapshot), followed by the option when the update need to take place. There are two options: on next shutdown (not right now) and immediately. From an end-user perspective there is difference, with the second option (immediately) the VDI will be closed down and updated even when the user is actively using it.
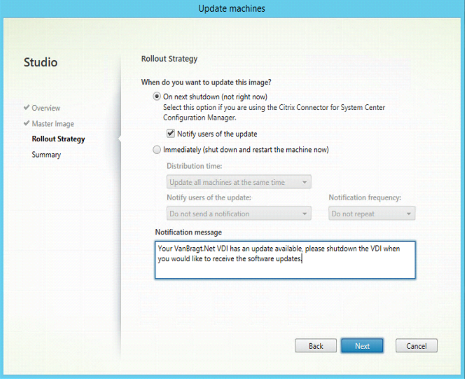
With on next shutdown the updates will be executed when the user will shutdown his session. From a technical perspective there is no difference. The following steps are executed:
- The first step is that from the selected Master VM (snapshot) a new basedisk is copied.
- Just as with the initial setup a temporary VM is started executing the same steps (Office and Windows re-arming).
- For each VDI a new difference disk is being created and the old is still be there as well. This does not show up in the XenCenter GUI. If you don’t have thin based storage you will this growth in the used size in the XenCenter GUI of the SR. Keep in mind that you need to have free space available on your SR.
- At that point it looks like the process is finished. However when we check on XenServer with CLI commands you will see that the process is not totally finished.
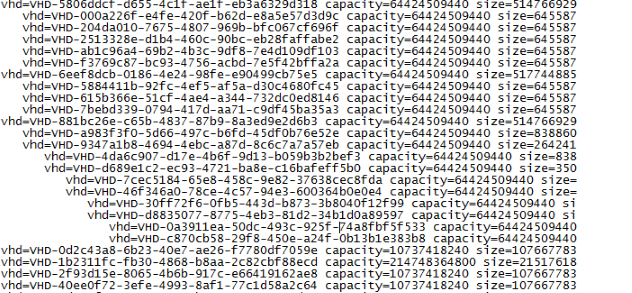
As shown in above figure a new chain is now available. This sounds logical as a new basedisk is available. As you can see the old chain is also available. In the case you use the update on next shutdown option this is pretty logical as the machines with a session are still running on that particular version. However in this case we have chosen to update all VMs directly. You would expect that all VMs are linked to the new basedisk. We found out that the connection to the new basedisk is actually done when the machine is booted out of Citrix XenDesktop (by XenDesktop automatically to ensure VDIs are directly are available for sessions or manually from Citrix Studio). When (in this case) the VM is started using Citrix XenCenter the VM is still using the “old” basedisk. So there is a mechanism in Studio that triggers the process in XenServer to link the VMs to another basedisk. I verified this at Citrix and this is indeed the case. There is an additional task which is executed later.
- The task is that during the bootup task of the VDI the disk is actually attached to the VM out of Citrix XenDesktop (Studio) independent which update methodology is being used. Depending on the usage of your VDI environment and available VDIs this can take some time before all VDIs are started after the update.
- Finally when no VMs are linked to the basedisk Citrix will delete the old basedisk and the diskspace is available again and the updates process is totally executed. This should be taken into account by determining the time between updates. As XenDesktop does not take disk space into account and just “fires” commands to XenServer to create additional VMs.
MCS Naming Convention
We are at the point that we have looked at the possibilities of MCS, the creation options and the update possibilities. I would like to touch two other related topics as I have notices that those are not fully clear to everyone. First I will start with the naming convention of the VDIs (called account naming scheme). When creating a Machine Catalog or adding additional machines this part is available.
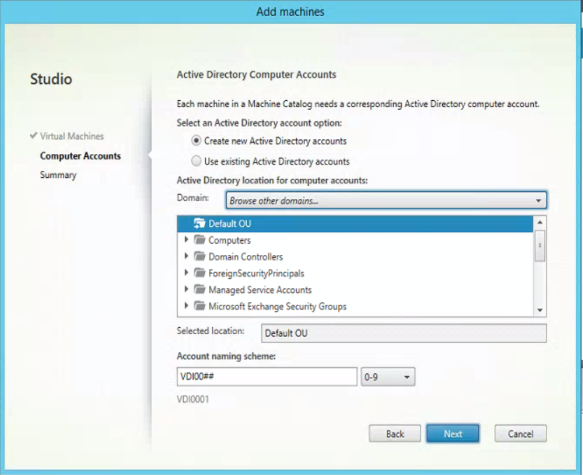
Especially showed by adding additional machines the way the convention works can cause computer names that are not the way the administrator wants them to have. When setting-up the naming convention you will use hashes (#) for the part, which will be generated by XenDesktop. When adding machines it looks like that you can change the naming convention on all fronts, but you are not changes the parts generated by XenDesktop (the hashes part). This part is actually a counter stored in the database, which is just raised by one if a new machine is added. So when the first part of the naming convention will be changed the current value in the counter just will be added. This can lead to that computer names that are not the way the administrator thought it would be. The counter can be checked using the PowerShell command Get-AcctIdentityPool. This shows the all MCS based Machine Catalogs including the naming convention schema and the value of the counter.
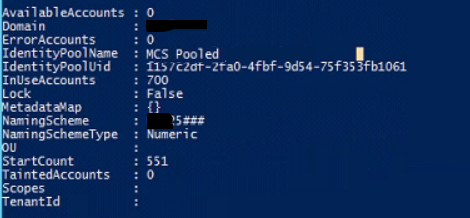
The value behind StartCount is the current value. In the above shown print screen the value 551. The next machine will get 552 at the end of the computer name. If needed you can configure another value via the command New-AcctAdAccount -IdentityPoolName '%IdentityPoolName%' -Count 1 -StartCount X or Set-AcctIdentityPool -IdentityPoolName '%IdentityPoolName%' -StartCount X
Temporary Data Cache
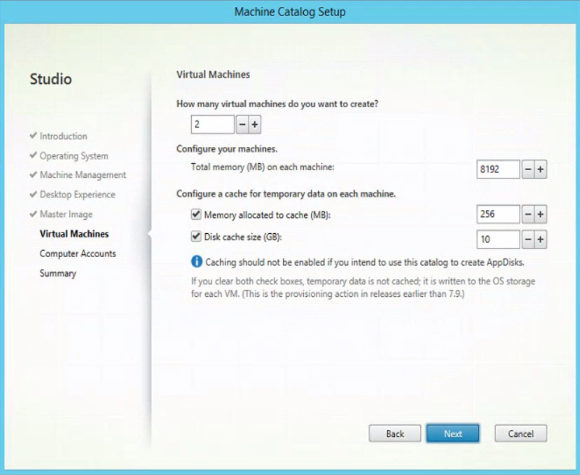
From XenDesktop 7.9 and higher in the MCS wizard at the Virtual Machines part new configuration options are available for a random based pool. Before this cache for temporary data was available all information was written on the VM disk. With this option you can use memory for caching temporary data instead of the disk. The feature is comparable with PVS Write Cache option using RAM with overflow to disk. As George Spiers already wrote an good article about this feature I’m just going to refer to that article for all information about this feature: http://www.jgspiers.com/machine-creation-services-storage-ram-disk-cache/.
Summarization
In this article series I tried to provide a deep-dive in the Machine Creation Service (MCS) feature/product in Citrix XenDesktop. In this last part we discussed the update process for all MCS deployment types and more information about the options Naming Convention Scheme and Temporary Data Cache.
And I will finish the article with big thanks to Daniel Feller, Paul Browne and Rico Projer who wrote other articles I used for input, pointed me to other articles, answered questions and/or reviewed (part) of the article serie. Also special thanks to Raymon van Montfrans who delivered lots of information for this article gathered during the troubleshooting we have done at the customer with MCS.